WordPress AI Blog Poster and the Right Format for Texts from AI
The WordPress AI blog poster closes the gap between a text that an AI assistant has written and a post that is actually live. AI output usually arrives as a chat reply, with no separate title, no clean markup and no plan for when it should appear. The tool takes such texts, recognizes the title and the structure, turns them into a proper article file and then publishes them on schedule. It is useful for anyone who produces many AI-assisted articles and does not want to reformat each one by hand.

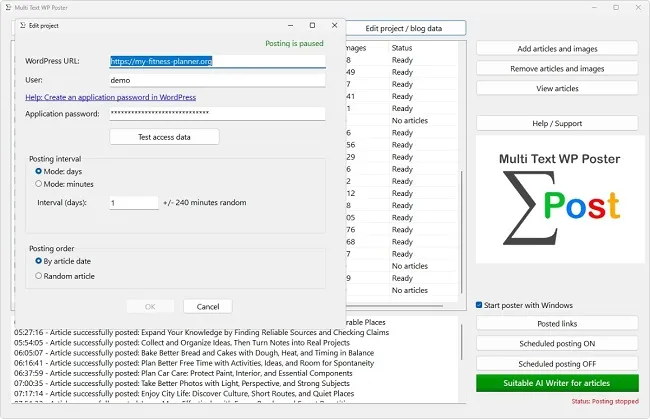
An AI assistant delivers a finished article in minutes. The real effort starts afterwards: splitting off the title, marking up headings, tidying paragraphs, removing asterisks and hash signs from the text. If you do that by hand for every article, you quickly lose the time you gained. This WordPress AI blog poster closes exactly this gap between text generator and blog. Multi Text WP Poster offers three ways to do it, and a fourth, the prompt, decides how much manual work is left in the end.
What an AI Text Brings Along and What It Lacks
Chat tools output their answers as formatted text. What you see in the window are headings, lists and bold type. When you copy that out, it depends on where you paste it: in a word processor the formatting is usually preserved, in a plain editor often only special characters such as hash signs and asterisks remain, which were actually meant to express headings and bold text.
A blog needs something different: a title as a separate field and a body as HTML. Headings have to be marked up as headings, paragraphs as paragraphs. An AI text does not meet that out of the box; it is an intermediate product. Between it and the finished post lies a conversion step that the WordPress AI blog poster handles more reliably than you can by hand.
Then there is the handling of batches in the WordPress AI blog poster. If you generate not one but twenty articles at once, you do not want to enter them one by one in the backend. The route via this WordPress AI blog poster has the advantage that every text is treated by the same scheme. That avoids differences in formatting and structure that would be almost unavoidable with twenty manual jobs. The three ways to use the WordPress AI blog poster differ only in how much of the conversion the program takes over for you.
The AI Writer from the Same Company as the First Way
The most convenient way into the WordPress AI blog poster leads through the AI Writer, a standalone program from the same maker. The main window has its own button for it. If the AI Writer is present on the computer, the button reads "Start AI Writer" and opens it directly. If it is missing, the label is "Suitable AI Writer for articles", and a click leads to an information page.
Since the AI Writer is offered in the interface explicitly as the matching partner for the articles of your WordPress AI blog poster, it is worth trying first. Anyone who regularly produces larger volumes finds in it the shortest path from order to finished text in the WordPress AI blog poster. Whether it meets your requirements for style and topics is shown by a test with three or four articles, where you look at result and effort.
The AI Writer is not a requirement for this WordPress AI blog poster, though. The WordPress AI blog poster works with texts from any source, whether from a chat assistant, a copywriter or your own pen. The next two ways show how that works. If you first need only a few test articles, you can do well without an additional program and decide later whether switching is worthwhile. Switching is possible at any time because both routes meet in the same article format.
Pasting Text into the Paste Field as the Second Way
During import there is a field with the prompt "Paste text into the field". You copy the article from the chat, a document or a web page and paste it there. The WordPress AI blog poster recognizes from the content itself what it has in front of it and chooses the matching conversion. Then it creates an article file with a running number.
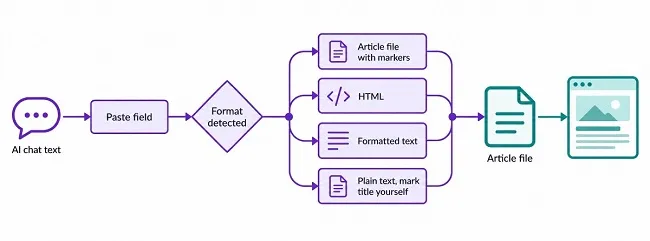
| What you paste | What the program makes of it |
|---|
| Text that already contains [TITLE] and [TEXT] | takes the file as it is, including optional fields such as tags or meta details |
| HTML source code | takes the first H1 as the title and removes it from the text |
| formatted text, for example from Word or a web page | converts it to HTML; the first H1 or the first line of text becomes the title |
| plain text without formatting | displays it, and you mark title and headings yourself |
Detection in the WordPress AI blog poster runs automatically, and you do not have to select anything. Only with plain text does the WordPress AI blog poster ask for your help, because there is nothing by which it could reliably recognize title and headings. That is more honest than guessing and picking the wrong sentence as the title.
Marking Up Plain Text with Title Line and Headings
When the WordPress AI blog poster recognizes plain text, a notice appears saying that you should mark the title line and, if required, the headings. To do so, place the cursor in the right line and click "Mark title line". You proceed the same way with subheadings, for which there is the "Mark headings" button. It can be switched on and off per line in case you made a mistake.
The result in the WordPress AI blog poster is tidy and clean. The title line moves into the title field. Every line marked as a heading becomes a second-level heading, and all other non-empty lines become paragraphs. Empty lines are dropped. The program observes two rules here: an empty line can be neither title nor heading, and the title line cannot at the same time be a heading. Once you are satisfied, "Use post" adds the article.
A word on preparation: if you copied the text from a chat, remove formatting characters such as hash signs and asterisks before pasting. The WordPress AI blog poster treats plain text literally, so a "##" in front of a line would stay behind as a visible character in the finished post. A quick look at the pasted text before you confirm saves the search later on the site.
Word Documents and Formatted Texts as the Third Way
Many texts come from word processors, for example when a copywriter delivers Word files. During import, files in .docx format can be selected directly. The program converts them to HTML and prepares them for the WordPress AI blog poster. How this file import works in detail is described in a separate article on the topic of import.
Alternatively, copy the text from the document and paste it into the paste field of the WordPress AI blog poster. Because Word carries formatting along, the WordPress AI blog poster recognizes it as formatted text. It turns it into HTML and looks for a main heading to serve as the title. If it finds none, it uses the first non-empty line. The first line of a Word document should therefore actually be the title, otherwise a sentence from the body text ends up in the title field.
In Word, create headings with the built-in styles and not by simply enlarging the font. That way the conversion recognizes them most reliably as headings. Manually formatted lines look identical in the document but are ordinary text to the converter.
Typical Stumbling Blocks with the WordPress AI Blog Poster
Even with a good prompt, a few sources of error remain that are quickly spotted if you know what to look for. The following list is limited to format. Whether a text is correct in content is another question and is treated separately.
- Several main headings: the WordPress AI blog poster makes only the first one the title. Every further one stays in the text as a heading and looks like a second title there. Allow only one main heading and structure beneath it with second-level headings.
- The title appears twice: if the title and the first line of the text are identical, the heading appears in the post twice, once as the post title and once in the text.
- Introductory chat sentences: lines like "Sure, here is the article" end up in the post if you do not remove them beforehand. At the start they are especially tricky, because the WordPress AI blog poster may interpret them as the title.
- Markdown characters: hash signs, asterisks and vertical bars stay visible as characters in plain text. A table written in Markdown is just a grid of lines in the blog.
- Long titles: a title spanning a whole sentence looks bulky as a post heading and gets cut off in search results. Trim it to the essentials.
A quick check of the finished article file before it goes into the stock reveals almost all of these points. Open it in a text editor and check the title, the beginning of the text and the end. After two or three articles you have a feel for what matters, and the look takes only seconds.
The Prompt as a Fourth Way to Get the Format Right Away
If you produce many articles, you save the most by letting the AI answer in the right format from the start. Ask the assistant to output each article as HTML: the headline as the main heading, subheadings at the second level, paragraphs in paragraph tags, bullet points as lists. When you paste this HTML text, the WordPress AI blog poster makes the first main heading the title and removes it from the body.
The variant of letting the AI write the complete article file goes even further. For this, ask for the sections TITLE, TAGS, URL, META-TITLE, META-DESCRIPTION and TEXT in exactly this spelling. If the result contains the markers [TITLE] and [TEXT], the WordPress AI blog poster takes it over unchanged, including all optional fields. Test the prompt on two or three sample articles before you generate larger quantities, and save the wording that works reliably. Also make sure the answer contains only the article and no introductory sentences such as "Here is your text". Such lines would otherwise end up as the title or as the first paragraph in the post.
|



