WordPress Blog Auto Poster Setup from Application Password to Your First Project
Think of the WordPress blog auto poster as a permanent connection between one folder on your computer and one blog on the web. Once the connection is set up, everything you drop into that folder becomes a candidate for publication. The tool remembers where the blog lives, which user it may act as and how often it should post. That makes it useful for site owners who want a blog to keep growing without a daily routine, and especially for those who look after more than one site, because each blog simply gets its own folder and its own settings.

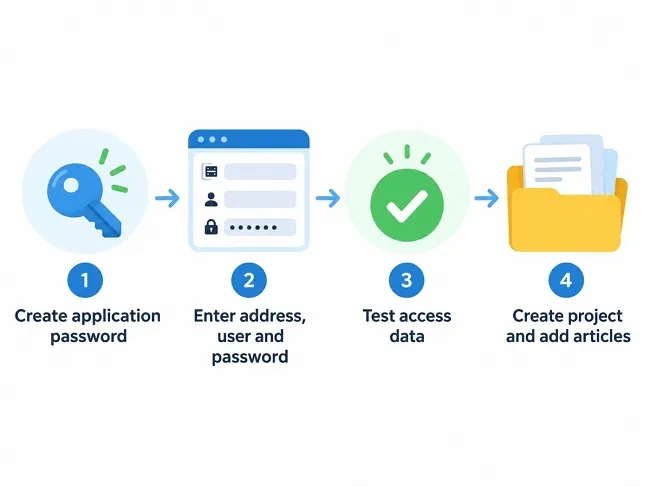
Setup is the only moment when this WordPress blog auto poster demands your attention. After that it runs on its own. But the start has to be right: the correct address, a suitable user and an application password that WordPress issues specifically for this purpose. If you prepare these three things cleanly, you are done in ten minutes. If you start your WordPress blog auto poster with your normal login password instead, you can easily lose an hour. This guide walks step by step through everything Multi Text WP Poster asks for when you create a new project.
What to Have Ready Before You Start
Before you open the WordPress blog auto poster, a quick look at the prerequisites pays off. First you need the address of your blog exactly as it appears in the browser, starting with https. Second, you need a WordPress user who is allowed to publish posts. Third, you need an application password for exactly that user. And fourth, a few finished articles should sit in a folder so you can test the setup with real data right away.
- the address of the site, for example https://www.example-blog.com
- a user name with the right to publish posts
- an application password, which you will generate in the next section
- two or three test articles
One point is often overlooked: WordPress normally issues application passwords only for sites reachable over an encrypted connection. If your blog still runs without an SSL certificate, fix that first. Some security plugins and a few hosts also switch the feature off. If the section does not show up in your profile, it is almost always one of these two causes. A look at the security plugin's settings or a short message to your host's support usually clears it up quickly.
Creating the Application Password in WordPress
An application password is a standalone access code for a single program. It has a practical advantage: your normal login password stays untouched, and you can revoke the code at any time without changing anything else. WordPress has included this feature since version 5.6, so no extra plugin is needed.
- Log in to the WordPress backend with the user the WordPress blog auto poster is going to use later.
- Open "Users" in the menu, then your profile.
- Scroll all the way down to the "Application Passwords" section.
- Under "New Application Password Name", enter a label, for example "Auto Poster".
- Click "Add New Application Password".
- Copy the displayed code immediately. WordPress shows it only this one time.
Do not park the code on a sticky note next to your monitor. Enter it straight into the WordPress blog auto poster. If it gets lost, that is no drama: you delete the entry in your profile and generate a new one. If you run the WordPress blog auto poster for several blogs, give each site its own label. That way you can tell later which access was meant for what.
Creating the Project in Your WordPress Blog Auto Poster
In the main window, click "Add project / WordPress website". A dialog opens with everything needed for a new project. You begin with the WordPress address. As soon as you type it, the WordPress blog auto poster fills in the project name itself: it takes the domain, removes the "www" and appends any subfolder with a hyphen. So https://www.example-blog.com becomes example-blog.com. The name also serves as the folder name, and the WordPress blog auto poster does not allow two projects with the same name.
Next you enter the user name and the application password. You may paste the password the way WordPress shows it, in six groups of four characters with spaces, or without spaces as 24 characters in a row. Under "Posting interval" and "Posting order" defaults are already set, and you can leave them unchanged for the first run. How to control the rhythm in detail is described in a separate article on scheduling.
Note that the WordPress blog auto poster pauses posting while you edit. In the dialogs you will see the notice "Posting is paused". That is intentional: while you change settings, no post should suddenly go out. As soon as you close the dialog, operation continues as normal. The "Create project" button of the WordPress blog auto poster, however, stays locked until the connection test has passed. That leads directly to the next section.
Testing the Access Data and Reading the Feedback
The "Test access data" button becomes active as soon as address, user and password are filled in. In the WordPress blog auto poster, the test is not optional but mandatory: only when it passes can the project be created. If you change one of the three fields afterwards, the result expires and you have to test again. When the test succeeds, the message "Access data is correct! Everything works!" appears. That confirms that address, user and application password belong together and that the site answers.
Even before the WordPress blog auto poster contacts your site at all, it checks the shape of the password. If the entry does not look like an application password, a notice window opens. It explains that you need to create a dedicated application password and offers instructions. This happens almost every time when the ordinary login password was entered. The check spares you a failed attempt that would otherwise only fail after a waiting period.
If the connection itself fails, there are usually two causes. Either one of the three entries is wrong, or the site does not answer in time. After 90 seconds without a response, the notice "Website not reachable!" appears, asking you to check your internet connection, address and access data. Incidentally, the test reads your blog's categories. That connection is needed later when you assign categories to articles. A passing test is therefore the foundation for everything your WordPress blog auto poster does afterwards.
Entering the Address Correctly
The address is the most common source of errors in the WordPress blog auto poster setup because it looks so harmless. Enter it exactly as your blog can be reached in the browser. If the site runs at https://www.example-blog.com, the "www" should be part of the address as well, not just the bare domain. The reason: many servers redirect one spelling to the other, and with such redirects the access code can get lost along the way. The login then fails even though all the details are right.
The same applies to http and https. Use the encrypted variant if your site offers it. If the blog lives in a subfolder, for example example.com/magazine, the subfolder belongs in the address.
If you are unsure, open the home page in the browser and copy the address from the address bar. Delete everything that follows the domain name or the subfolder, such as a post title or a "/wp-admin". The address of the home page is completely sufficient. If the test does not work with that spelling, try the variants with and without "www" one after the other. Very often the problem lies there alone.
Which User Suits the Automaton
Many people use their administrator login for the WordPress blog auto poster because it is at hand anyway. That works, but it is not the cleanest solution. The user whose application password you enter appears as the author of the published posts. That may be intended, for example if you write under your own name anyway. For a magazine or an editorial site it is often inappropriate.
For this WordPress blog auto poster, consider creating a dedicated user whose display name fits the blog, for example "Editorial team". The "Author" role is usually enough, because an author may publish and upload their own posts. An administrator account, by contrast, has far more rights than posting requires. Should an access code ever fall into the wrong hands, the damage with an author account is much smaller.
Whether you run your WordPress blog auto poster with an account that has a nice name or with your own is in the end a matter of taste. What matters is that the user fits your plan and has the right to publish posts. If it lacks that right, the test may still pass while later posting fails. When in doubt, check the role right away.
The First Run and a Quick Check after Creating the Project
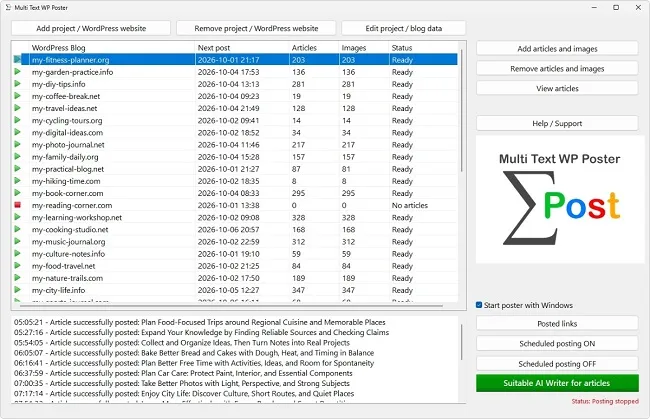
After creation, the new project appears in the overview. Now copy two or three articles into the project folder of your WordPress blog auto poster. The WordPress blog auto poster counts them and shows the number in the "Articles" column, and the status jumps to "Ready". If the folder is still empty, it says "No articles". That is not an error, only a sign that there is nothing to publish yet.
In the "Next post" column of your WordPress blog auto poster you can see when the first post is due. Let your WordPress blog auto poster run through without interfering and then look at the blog. Check title, formatting, images and category. If something does not please you, change the template for the remaining articles before the rest of the stock follows. A thorough first pass saves a lot of rework later.
Also keep in mind that the WordPress blog auto poster only works while the computer is switched on at the scheduled time. If you create the project in the evening and turn the computer off for the night, you will wonder the next morning why no post appeared. With a little routine this becomes a side issue, but on the very first attempt it is the most common reason for confusion.
|



